Lightweight universal DDNS Updater with Docker and web UI
Light container updating DNS A records periodically for GoDaddy, Namecheap, Cloudflare, Dreamhost, NoIP, DNSPod and DuckDNS
SQLite migration support will be removed on 1 April 2020, so be sure to update your image before that


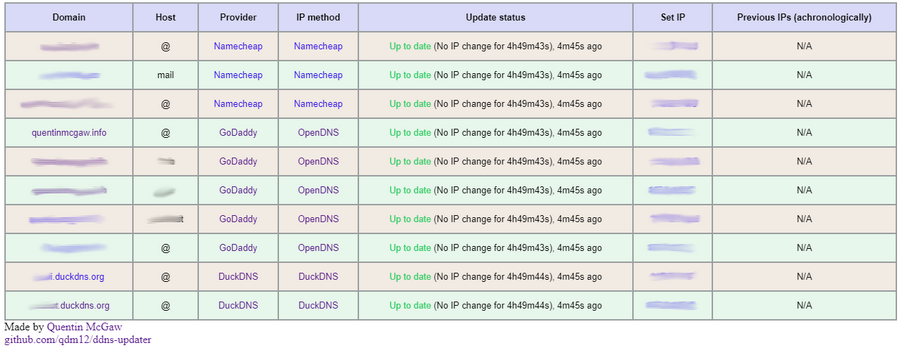
![]()


Features
- Updates periodically A records for different DNS providers: Namecheap, GoDaddy, Cloudflare, NoIP, Dreamhost, DuckDNS (ask for more)
- Web User interface
- Lightweight based on a Go binary and Alpine 3.11 with Sqlite and Ca-Certificates packages
- Persistence with a JSON file updates.json to store old IP addresses with change times for each record
- Docker healthcheck verifying the DNS resolution of your domains
- Highly configurable
- Sends notifications to your Android phone, see the Gotify section (it's free, open source and self hosted 🆒)
- Compatible with
amd64,386,arm64andarm32v7(Raspberry Pis) CPU architectures.
Setup
-
To setup your domains initially, see the Domain set up section.
-
Create a directory of your choice, say data with a file named config.json inside:
mkdir data
touch data/config.json
# Owned by user ID of Docker container (1000)
chown -R 1000 data
# all access (for creating json database file data/updates.json)
chmod 700 data
# read access only
chmod 400 data/config.json
(You could change the user ID, for example with
1001, by running the container with--user=1001) -
Modify the data/config.json file similarly to:
{
    "settings": [
        {
            "provider": "namecheap",
            "domain": "example.com",
            "host": "@",
            "ip_method": "provider",
            "delay": 86400,
            "password": "e5322165c1d74692bfa6d807100c0310"
        },
        {
            "provider": "duckdns",
            "domain": "example.duckdns.org",
            "ip_method": "provider",
            "token": "00000000-0000-0000-0000-000000000000"
        },
        {
            "provider": "godaddy",
            "domain": "example.org",
            "host": "subdomain",
            "ip_method": "duckduckgo",
            "key": "aaaaaaaaaaaaaaaa",
            "secret": "aaaaaaaaaaaaaaaa"
        }
    ]
}
See more information in the configuration section
-
Use the following command:
docker run -d -p 8000:8000/tcp -v $(pwd)/data:/updater/data qmcgaw/ddns-updaterYou can also use docker-compose.yml with:
docker-compose up -d
Configuration
Start by having the following content in config.json:
{
    "settings": [
        {
            "provider": "",
            "domain": "",
            "ip_method": "",
        },
        {
            "provider": "",
            "domain": "",
            "ip_method": "",
        }
    ]
}
The following parameters are to be added in config.json
For all record update configuration, you need the following:
"provider"is the DNS provider and can be"godaddy","namecheap","duckdns","dreamhost","cloudflare","noip", or"dnspod""domain""ip_method"is the method to obtain your public IP address and can be:"provider"means the public IP is automatically determined by the DNS provider (only for DuckDNs, Namecheap and NoIP)"google"using https://google.com/search?q=ip"opendns"using https://diagnostic.opendns.com/myip
You can optionnally add the parameters:
"delay"is the delay in seconds between each update. It defaults to theDELAYenvironment variable value."no_dns_lookup"can betrueorfalseand allows, iftrue, to prevent the periodic Docker healthcheck from running a DNS lookup on your domain.
For each DNS provider exist some specific parameters you need to add, as described below:
Namecheap:
"host"is your host and can be a subdomain,"@"or"*"generally"password"
Cloudflare:
"zone_identifier""identifier""host"is your host and can be a subdomain,"@"or"*"generally"ttl"integer value for record TTL in seconds (specify 1 for automatic)- One of the following:
- Email
"email"and key"key" - User service key
"user_service_key" - API Token
"token", configured with DNS edit permissions for your DNS name's zone.
- Email
- Optionally,
"proxied"can betrueorfalseto use the proxy services of Cloudflare
GoDaddy:
"host"is your host and can be a subdomain,"@"or"*"generally"key""secret"
DuckDNS:
"token"
Dreamhost:
"key"
NoIP:
"host"is your host and can be a subdomain or"@""username""password"
DNSPOD:
"host"is your host and can be a subdomain or"@""token"
Environment variables
| Environment variable | Default | Description |
|---|---|---|
DELAY |
10m |
Default delay between updates, following this format |
ROOT_URL |
/ |
URL path to append to all paths to the webUI (i.e. /ddns for accessing https://example.com/ddns through a proxy) |
LISTENING_PORT |
8000 |
Internal TCP listening port for the web UI |
LOG_ENCODING |
console |
Format of logging, json or console |
LOG_LEVEL |
info |
Level of logging, info, warning or error |
NODE_ID |
0 |
Node ID (for distributed systems), can be any integer |
HTTP_TIMEOUT |
10s |
Timeout for all HTTP requests |
GOTIFY_URL |
(optional) HTTP(s) URL to your Gotify server | |
GOTIFY_TOKEN |
(optional) Token to access your Gotify server |
Host firewall
If you have a host firewall in place, this container needs the following ports:
- TCP 443 outbound for outbound HTTPS
- TCP 80 outbound if you use a local unsecured HTTP connection to your Gotify server
- UDP 53 outbound for outbound DNS resolution
- TCP 8000 inbound (or other) for the WebUI
Domain set up
Namecheap

- Create a Namecheap account and buy a domain name - example.com as an example
- Login to Namecheap at https://www.namecheap.com/myaccount/login.aspx
For each domain name you want to add, replace example.com in the following link with your domain name and go to https://ap.www.namecheap.com/Domains/DomainControlPanel/example.com/advancedns
-
For each host you want to add (if you don't know, create one record with the host set to
*):-
In the HOST RECORDS section, click on ADD NEW RECORD
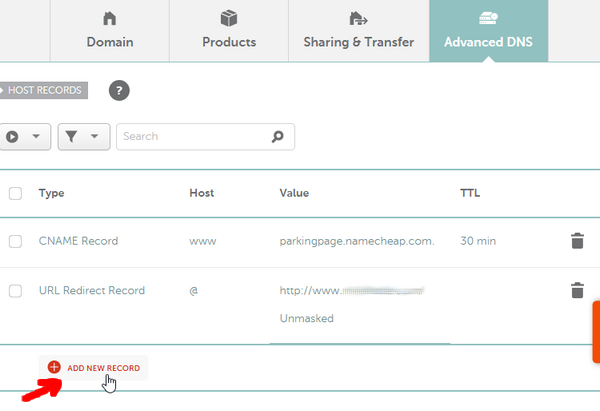
-
Select the following settings and create the A + Dynamic DNS Record:

-
-
Scroll down and turn on the switch for DYNAMIC DNS

-
The Dynamic DNS Password will appear, which is
0e4512a9c45a4fe88313bcc2234bf547in this example.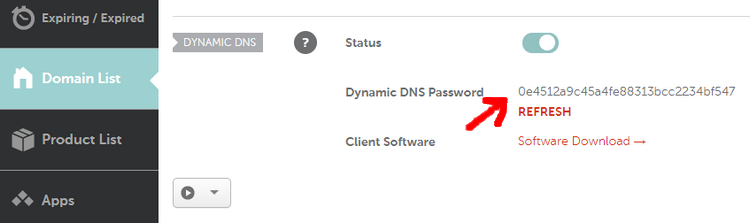
GoDaddy

- Login to https://developer.godaddy.com/keys with your account credentials.

- Generate a Test key and secret.

- Generate a Production key and secret.

Obtain the key and secret of that production key.
In this example, the key is dLP4WKz5PdkS_GuUDNigHcLQFpw4CWNwAQ5 and the secret is GuUFdVFj8nJ1M79RtdwmkZ.
DuckDNS

See duckdns website
Cloudflare
-
Make sure you have
curlinstalled -
Obtain your API key from Cloudflare website (see this)
-
Obtain your zone identifier for your domain name, from the domain's overview page written as Zone ID
-
Find your identifier in the
idfield withZONEID=aaaaaaaaaaaaaaaaaaaaaaaaaaaaaaaaaaaaa EMAIL=example@example.com APIKEY=aaaaaaaaaaaaaaaaaa curl -X GET "https://api.cloudflare.com/client/v4/zones/$ZONEID/dns_records" \ -H "X-Auth-Email: $EMAIL" \ -H "X-Auth-Key: $APIKEY"
You can now fill in the necessary parameters in config.json
Special thanks to @Starttoaster for helping out with the documentation and testing.
Gotify

Gotify is a simple server for sending and receiving messages, and it is free, private and open source
- It has an Android app to receive notifications
- The app does not drain your battery 👍
- The notification server is self hosted, see how to set it up with Docker
- The notifications only go through your own server (ideally through HTTPS though)
To set it up with DDNS updater:
- Go to the Web GUI of Gotify
- Login with the admin credentials
- Create an app and copy the generated token to the environment variable
GOTIFYTOKEN(for this container) - Set the
GOTIFYURLvariable to the URL of your Gotify server address (i.e.http://127.0.0.1:8080orhttps://bla.com/gotify)
Testing
- The automated healthcheck verifies all your records are up to date using DNS lookups
- You can check manually at:
-
GoDaddy: https://dcc.godaddy.com/manage/yourdomain.com/dns (replace yourdomain.com)

You might want to try to change the IP address to another one to see if the update actually occurs.
-
Development
Using VSCode and Docker
- Install Docker
- On Windows, share a drive with Docker Desktop and have the project on that partition
- With Visual Studio Code, install the remote containers extension
- In Visual Studio Code, press on
F1and selectRemote-Containers: Open Folder in Container... - Your dev environment is ready to go!... and it's running in a container 👍
You can probably start looking at the cmd/updater/main.go file which is the entrypoint of the program.
Used in external projects
TODOs
- Other types or records
- Support Infomaniak.com
- icon.ico for webpage
- Record events log
- Hot reload of config.json
- Unit tests
- ReactJS frontend
- Live update of website
- Change settings